・動機
・やりたいこと
・準備
・類似度の計算
・実行コード
・実行結果
・おまけ
動機
画像系の技術にあまり関心が無かったのですが、とある知人が福士蒼汰のような雰囲気の男性が好みであると発言されたことを発端に、福士蒼汰に最も顔の近い知人を見つけるというプライベートなミッションを仰せつかりました。
そこで、まずは最も楽だろうと思われる、画像間の類似度を計算する方法について調べてみました。顔のパーツを検知して、パーツ同士で比較するなどのレベルでは無いことをご了承下さい。ちなみに、比較画像は国民的アイドルである嵐のメンバーの画像としました。今回の実践で、与えられた画像の中で、福士蒼汰に最も近そうな嵐のメンバーの写真がわかることになります。
やりたいこと
画像間の類似度の計算
準備
・Python2.7
・OpenCV
OSX環境における準備にあたっては以下の情報が参考になりました。
PythonでOpenCVを使う
Mac OS X で OpenCV 3 + Python 2/3 の開発環境を整備する方法
類似度の計算
こちらのブログにある計算手法とコードを使いました。
How-To: Python Compare Two Images
紹介されているコードで以下の評価指標が計算できます。
・Mean Squared Error (MSE)
・Structural Similarity Index (SSIM)・・・0〜1の値を取ります。
指標について、詳しくはこちらの論文に書かれています。
Image Quality Assessment: From Error Visibility to Structural Similarity
実行コード
紹介されていたコードは画像サイズが同じでないと計算ができなかったので、まずは画像のサイズを整えるためのコードが以下のようになります。コードはこちらのものを使いました。
Python – アンチエイリアスで写真をキレイに縮小
|
1 2 3 4 5 6 7 8 9 10 11 12 13 14 15 16 17 18 19 20 21 22 23 24 25 26 27 28 29 30 31 32 33 34 35 36 37 38 39 40 41 42 43 44 45 46 47 48 49 50 51 52 53 54 55 56 57 58 59 60 61 62 63 64 65 |
# -*- coding: utf-8 -*- import commands from PIL import Image import re # 縮小する際の画像の高さピクセル PHOTO_HEIGHT = 400 # 画像があるフォルダのフルパス BASE_DIR = "/任意のフォルダのパス/" # 画像の正規表現名 PHOTO_REGEX = r"pic00.*.[jpg|jpeg]" # リサイズ後の画像の接頭語 PHOTO_RESIZE_PREFIX = "r_" def main(): # 画像フルパスを取得 _cmd = "cd {} && ls".format(BASE_DIR) l = commands.getoutput(_cmd) l = l.split("\n") l = [_l for _l in l if re.match(PHOTO_REGEX, _l)] # 出力用のフォルダを生成 commands.getoutput("mkdir {}/output".format(BASE_DIR)) # 既存ファイルを readモードで読み込み for _l in l: before_path = '{}/{}'.format(BASE_DIR, _l) filename = '{}{}'.format(PHOTO_RESIZE_PREFIX, _l) after_path = '{}/output/{}'.format(BASE_DIR, filename) resize(before_path, after_path, filename=_l) # 縮小 def resize(before, after, height=PHOTO_HEIGHT, filename="", aa_enable=True): """ 画像をリサイズする :param str before: 元画像ファイルパス :param str after: リサイズ後の画像ファイルパス :param int height: リサイズ後の画像の高さ :param bool aa_enable: アンチエイリアスを有効にするか :return: """ # 画像をreadonlyで開く img = Image.open(before, 'r') # リサイズ後の画像ピクセルを計算 before_x, before_y = img.size[0], img.size[1] x = int(round(float(height / float(before_y) * float(before_x)))) y = height resize_img = img if aa_enable: # アンチエイリアスありで縮小 resize_img.thumbnail((x, y), Image.ANTIALIAS) else: # アンチエイリアスなしで縮小 resize_img = resize_img.resize((x, y)) # リサイズ後の画像を保存 resize_img.save(after, 'jpeg', quality=100) print "RESIZED!:{}[{}x{}] --> {}x{}".format(filename, before_x, before_y, x, y) # 実行 main() |
これだけではサイズが同一にならなかったので、追加で以下のコードを実行しました。
|
1 2 3 4 5 6 |
from PIL import Image img = Image.open('output/r_pic005.jpg') # image extension *.png,*.jpg new_width = 300 new_height = 400 img = img.resize((new_width, new_height), Image.ANTIALIAS) img.save('resize/re_pic005.jpg') |
以下は、類似度計算の実行用コードとなります。
|
1 2 3 4 5 6 |
# import the necessary packages from skimage.measure import structural_similarity as ssim import matplotlib.pyplot as plt import numpy as np import cv2 %matplotlib inline |
|
1 2 3 4 5 6 7 8 9 10 11 12 13 14 15 16 17 18 19 20 21 22 23 24 25 26 27 28 29 30 31 32 33 |
def mse(imageA, imageB): # the 'Mean Squared Error' between the two images is the # sum of the squared difference between the two images; # NOTE: the two images must have the same dimension err = np.sum((imageA.astype("float") - imageB.astype("float")) ** 2) err /= float(imageA.shape[0] * imageA.shape[1]) # return the MSE, the lower the error, the more "similar" # the two images are return err def compare_images(imageA, imageB, title): # compute the mean squared error and structural similarity # index for the images m = mse(imageA, imageB) s = ssim(imageA, imageB) # setup the figure fig = plt.figure(title) plt.suptitle("MSE: %.2f, SSIM: %.2f" % (m, s)) # show first image ax = fig.add_subplot(1, 2, 1) plt.imshow(imageA, cmap = plt.cm.gray) plt.axis("off") # show the second image ax = fig.add_subplot(1, 2, 2) plt.imshow(imageB, cmap = plt.cm.gray) plt.axis("off") # show the images plt.show() |
|
1 2 3 4 5 6 7 8 9 10 |
# load the images -- the original, the original + contrast, # and the original + photoshop original = cv2.imread("resize/re_pic006.jpg") contrast = cv2.imread("resize/re_pic005.jpg") shopped = cv2.imread("resize/re_pic003.jpg") # convert the images to grayscale original = cv2.cvtColor(original, cv2.COLOR_BGR2GRAY) contrast = cv2.cvtColor(contrast, cv2.COLOR_BGR2GRAY) shopped = cv2.cvtColor(shopped, cv2.COLOR_BGR2GRAY) |
|
1 2 3 4 5 6 7 8 9 10 11 12 13 14 15 16 17 18 19 |
# initialize the figure fig = plt.figure("Images") images = ("Original", original), ("Contrast", contrast), ("Photoshopped", shopped) # loop over the images for (i, (name, image)) in enumerate(images): # show the image ax = fig.add_subplot(1, 3, i + 1) ax.set_title(name) plt.imshow(image, cmap = plt.cm.gray) plt.axis("off") # show the figure plt.show() # compare the images compare_images(original, original, "Original vs. Original") compare_images(original, contrast, "Original vs. Contrast") compare_images(original, shopped, "Original vs. Photoshopped") |
実行結果
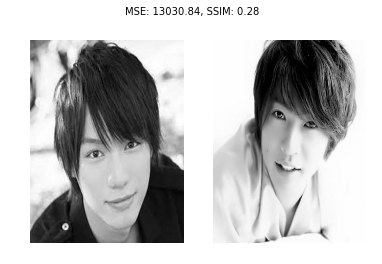
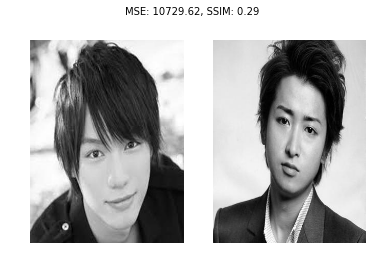
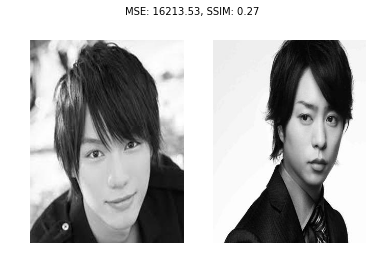
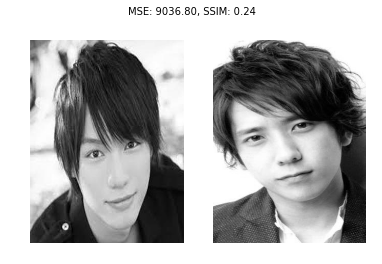
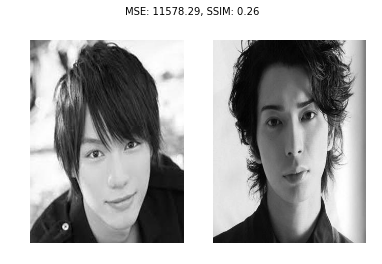
福士蒼汰との比較をしており、画像上部にMSEとSSIMが出ています。嵐の大野くんが一番近いようです。
おまけ
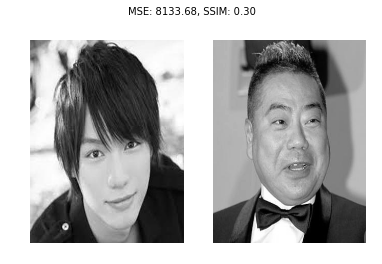
イケメンではないですが、出川哲朗でも計算してみました。
今回最も高い値が出てしまいました。やはり、顔のパーツを識別して、そのパーツ間の類似度の計算ができないといけないような気がします。悔しいので今後も画像認識系の技術について向き合ってみようと思います。

